 Skip to content
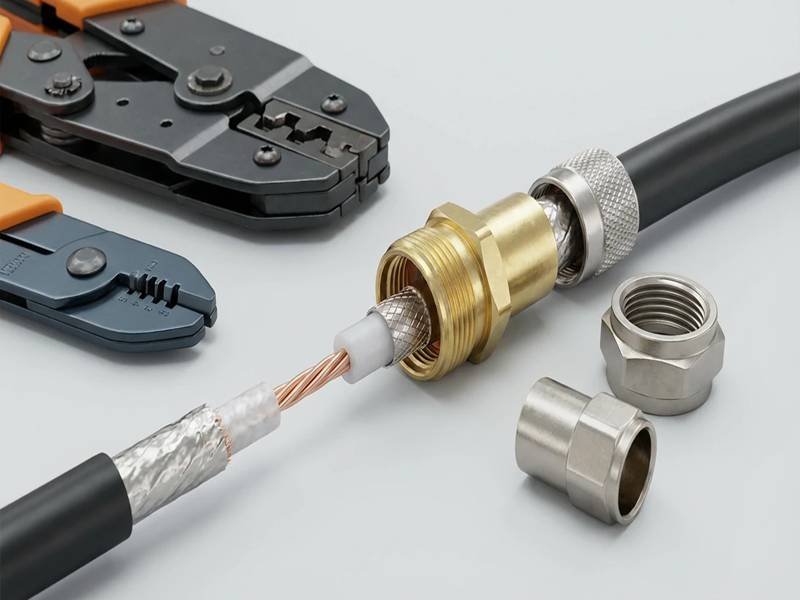
A coax cable usually does not fail all at once. In many systems, the first sign is small: a weaker signal, a noisy picture, unstable transmission, or a connection that works only when the cable is held in a certain position. Because the outside jacket often still looks normal, many people waste time replacing other parts first. They suspect the antenna, the modem, the camera, the board, or the connector on the equipment side, while the real problem is already inside the cable assembly.
Repairing coax cable is not just about reconnecting metal parts. A good repair has to preserve conductor contact, dielectric spacing, shielding coverage, and connector fit. If any one of these is off, the cable may “work,” but signal quality can still drop. In RF and communication systems, that difference matters a lot.
To repair coax cable properly, first identify whether the fault is in the connector, jacket, shield, center conductor, or a crushed section of cable. Then use the right stripping dimensions, the correct connector type, and a repair method that maintains shielding and impedance as closely as possible. Minor damage can often be repaired well. Repeated bending damage, water ingress, or severe deformation usually means replacement is the safer choice.
We have seen customers cut off and reinstall the same connector two or three times, only to make the loss worse each round. In one case, the real problem was a crushed cable section 120 mm away from the connector, not the connector itself. That is why the fastest repair is not always the first repair attempt. The real goal is to fix the actual fault once, not to keep trimming until the cable becomes shorter and less reliable.
What Is Coax Cable Repair?
Coax cable repair is the process of restoring a damaged coaxial cable so it can transmit signals reliably again. In practice, this usually means fixing or replacing connectors, removing a damaged section of cable, or correcting installation problems that are affecting signal performance.

For most customers, repair is not about “making the cable look good again.” It is about solving a real issue: signal loss, noise, unstable connection, or system failure. A cable can still pass a simple continuity test and yet perform poorly in actual use. That is why coax repair needs to focus on both electrical connection and structural integrity.
In real applications, especially in RF systems, antennas, cameras, or drone equipment, a coax cable works as a complete system made of four parts:
- Center conductor (signal path)
- Dielectric (maintains spacing and impedance)
- Shield/braid (protects against interference)
- Outer jacket (mechanical protection)
A proper repair must restore all four parts to work together again. If only the conductor is reconnected but the shielding is weak or uneven, the signal may still be unstable.
What Causes Coax Cable Damage?
Most coax cable issues are not random failures. They come from how the cable is handled, installed, or used over time.
Customers often assume that cables “wear out,” but in many cases the real cause is mechanical or installation-related. Based on the repair cases we see, the most common reasons are:
| Cause | What Happens | Result in System |
|---|---|---|
| Sharp bending | Internal spacing changes | Signal reflection, loss |
| Pulling force | Conductor or connector stress | Intermittent connection |
| Poor connector installation | Weak contact or uneven shield | Noise, unstable signal |
| Repeated movement | Metal fatigue near connector | Signal drop when moved |
| Environmental exposure | Material degradation | Reduced lifespan |
| Crushing or pinching | Permanent deformation | Impedance mismatch |
One common situation is cable routing inside tight spaces. If the bend radius is too small, the dielectric layer deforms slightly. This may not be visible, but it changes the cable’s impedance and affects signal transmission.
Another frequent issue is connector handling. Many repairs fail because the connector is not matched correctly to the cable type or installed with the wrong tool.
Which Types of Coax Cable Fail Most Often?
Failure risk depends heavily on cable structure and application.
From practical experience, the following types are more likely to need repair:
| Cable Type | Why It Fails More Often |
|---|---|
| Thin coax (micro coax) | Very sensitive to bending and stripping |
| Flexible RF cable | Repeated movement causes fatigue |
| Outdoor coax cable | Exposure to UV, moisture, temperature |
| Low-cost coax cable | Inconsistent shielding and materials |
In drone and compact electronic systems, thin coax cables are widely used because of space limitations. However, they require careful handling. Even a small mistake during installation—like cutting too deep while stripping—can reduce shielding performance.
For outdoor systems, water ingress is a major issue. Once moisture enters the cable, it can travel along the braid and affect a larger section than expected. In these cases, repair is often less reliable.
We also see many cases where the cable itself is not the main problem. Instead, the connector is the weak point. This is especially true when:
- The wrong connector type is used
- The crimp size does not match the cable
- The installation process is inconsistent
How Do You Know a Coax Cable Is Faulty?
A faulty coax cable does not always show visible damage. Most of the time, the problem appears as a system issue.
Customers usually notice:
- Signal becomes weaker than before
- Connection drops when cable is moved
- Noise or interference increases
- Data transmission becomes unstable
A practical way to identify the problem is to isolate the cable and test it step by step.
Here is a simple diagnostic approach:
| Step | What to Check | What It Tells You |
|---|---|---|
| Visual inspection | Jacket, connector, bending | Obvious physical damage |
| Wiggle test | Move cable slightly | Detect intermittent faults |
| Continuity test | Electrical connection | Broken conductor |
| Swap test | Replace with known good cable | Confirms cable vs system issue |
One pattern that shows up frequently is this:
The system works when the cable is in one position but fails when moved. This usually points to a weak connector joint or internal conductor damage near the connector.
In many repair cases we’ve reviewed at Sino-Conn, customers initially replaced equipment components before checking the cable. This adds unnecessary cost and delays.
A more efficient approach is:
- Check connectors first
- Then check cable sections
- Finally confirm with signal testing
Coax cable repair is not just about fixing what is broken. It is about understanding how the cable is used and making sure the repaired section can handle the same conditions again.
In some cases, a simple connector replacement restores full performance. In others, the cable has already been stressed beyond recovery, and replacing it or redesigning it becomes the better option.
If you are not sure whether your cable can be repaired or should be replaced, sharing a photo or basic details is often enough to make an initial evaluation and avoid unnecessary trial-and-error.
How to Repair Coax Cable Step by Step?
Repairing a coax cable sounds simple until signal quality gets worse after the repair. That is the part many customers do not expect. A coax cable can still show continuity and still perform badly if the stripping length is wrong, the braid is damaged, the connector does not match the cable, or the crimp is uneven. In low-frequency use, a rough repair may still “work.” In RF, antenna, video, test, or drone-related systems, small mistakes become much more obvious.
A useful way to think about coax repair is this: you are not just reconnecting metal. You are rebuilding a signal path. The center conductor, dielectric, braid, foil, and connector all need to stay in the right relationship. If one part is out of position, signal loss, noise, poor shielding, or intermittent contact can follow.
For many customers, the real goal is not simply to make the cable usable again. It is to decide whether the cable can be repaired once and used with confidence, or whether repeated rework will cost more time than making a new one. In the coax assemblies we support, this is often the real turning point: a quick repair is helpful, but only if it does not create a second problem.

What Tools Are Needed to Repair Coax Cable?
The quality of the repair depends heavily on the tools. A lot of field failures come from using general hand tools on cable types that really need cable-specific tooling. A knife may cut the jacket, but it can also nick the braid or dielectric. Standard pliers may press a connector, but they cannot control crimp size correctly. The repair may look acceptable from the outside and still fail electrically.
These are the tools that matter most:
| Tool | Main Use | Why It Matters |
|---|---|---|
| Coax cable cutter | Makes a clean end face | Prevents conductor deformation |
| Coax stripper | Removes jacket and dielectric to the right depth | Reduces braid and dielectric damage |
| Crimping tool | Secures crimp connector ferrule or pin | Controls pressure and repeatability |
| Compression tool | Used for compression-style connectors | Improves sealing and holding force |
| Small side cutter / tweezers | Trims braid neatly | Helps avoid stray shield strands |
| Multimeter | Continuity and short check | Fast first-level verification |
| VNA / RF tester / signal tester | Performance verification | Checks whether repair actually works |
A practical mistake many users make is mixing connector systems and tools. For example, an RG-style connector may look close enough, but if the ferrule diameter, pin size, or strip dimensions do not match the exact cable, the repair becomes unreliable. This is one reason why customers often send us the cable photo and connector photo together rather than only the cable type.
Another point customers care about is cost. For one or two field repairs, buying a full tool set may not seem worthwhile. But if the same cable type is repaired regularly, proper tools pay for themselves quickly by reducing failed repairs, wasted connectors, and troubleshooting time. In production and sample work, consistent tooling is not optional. It is one of the reasons custom coax assemblies stay more stable than repeated hand repairs.
How to Strip and Prepare Coax Cable?
Stripping is where a large percentage of repair mistakes happen. The cable may be cut straight, but if the shield is damaged or the dielectric is compressed, the connector will not seat correctly and the signal path changes. This is especially important in smaller coax types and higher-frequency assemblies, where tolerance is tighter and margin is lower.
A clean repair usually follows this order:
- Cut off the damaged end completely.
- Make sure the fresh cable end is round, not crushed.
- Strip the outer jacket to expose the braid or foil.
- Fold the braid back neatly if the connector design requires it.
- Strip the dielectric to expose the center conductor.
- Check that the conductor is straight and the dielectric is not scarred.
- Confirm dimensions before installing the connector.
The most important thing here is not speed. It is accuracy.
Here is a simple checklist customers can follow during prep:
| Area | What Good Prep Looks Like | What Usually Goes Wrong |
|---|---|---|
| Cable cut face | Flat and round | Cable crushed or angled cut |
| Outer jacket | Cleanly stripped | Too deep, braid cut |
| Braid | Even and intact | Broken strands, uneven fold-back |
| Foil | Preserved if required | Torn off when it should remain |
| Dielectric | Smooth and round | Nicks, compression, melting |
| Center conductor | Straight, correct length | Bent, shortened, or scratched |
Two small details matter a lot. First, stray braid strands must not touch the center conductor. That creates shorts or unstable behavior. Second, strip length has to match the connector. Too short and the conductor may not reach the contact correctly. Too long and exposed metal or poor seating can appear.
In actual work, this is where better process control makes a difference. In the coax assemblies we produce at Sino-Conn, strip dimensions are always matched to the specific cable and connector combination rather than estimated visually.
How to Install or Replace Coax Connectors?
Once the cable is prepared properly, the next step is connector installation. This is also the step where many repair attempts fail, especially when the connector type is wrong or the crimp is uneven. Customers often focus on whether the connector can fit onto the cable. The more important question is whether it fits correctly enough to maintain contact, shielding, and mechanical stability.
Most repairs involve one of these connector approaches:
| Connector Method | Where It Is Common | Main Advantage | Main Risk |
|---|---|---|---|
| Crimp connector | RF jumpers, many coax assemblies | Fast and consistent | Wrong die size causes failure |
| Compression connector | TV/data installations | Good retention and seal | Needs specific connector/tool match |
| Solder-style connector | Precision or special RF assemblies | Strong electrical connection | Heat can damage dielectric |
| Twist-on style | Low-cost field fixes | Simple | Lowest reliability |
The basic installation sequence is straightforward:
- Slide ferrule or rear parts onto cable first.
- Insert the prepared cable fully into the connector body.
- Make sure the center conductor enters the contact area correctly.
- Position the braid evenly under the ferrule or connector body.
- Crimp or compress with the correct tool setting.
- Inspect the finished connector from all sides.
The real problems happen in the details. A center conductor that is slightly too long may bottom out or deform. One that is too short may create weak contact. If the braid bunches up unevenly, shielding becomes inconsistent and the connector may not grip well mechanically. Over-crimping can deform the cable. Under-crimping can cause pull-out or intermittent shielding contact.
This is also where connector sourcing affects repair quality. Some customers want original branded connectors, while others need a faster or more economical equivalent. Both can work if matched correctly. In the assemblies we handle, the bigger issue is usually not whether the connector is branded or alternative, but whether it is dimensionally correct for the cable and installed with the right tooling.
How Do You Check Whether the Repair Is Actually Good?
A coax repair should not be judged only by appearance. Many repairs look clean and still perform badly. A connector may feel tight and still have poor center contact. Continuity may pass while return loss and shielding performance are already compromised. This is why a finished repair should be checked in steps, from simple to more demanding.
A practical inspection flow looks like this:
| Check | What to Look For | Why It Matters |
|---|---|---|
| Visual check | Straight connector, clean crimp, no stray braid | Finds obvious assembly mistakes |
| Pull check | Connector should not loosen easily | Confirms mechanical hold |
| Continuity check | Center-to-center continuity, shield continuity | Confirms electrical path |
| Short check | No short between conductor and shield | Avoids immediate failure |
| Signal test | Compare with known-good cable | Confirms real use performance |
| RF test if needed | Loss, mismatch, repeatability | Important for critical applications |
For customer-facing decision-making, this is the point where repair and replacement start to separate. If the cable is only used in a simple setup and the repaired connection is stable, the repair may be perfectly acceptable. If the cable is part of a performance-sensitive RF path, antenna line, drone system, or other critical link, a deeper signal check is the safer choice.
In many cases, customers contact Sino-Conn after several field repairs have already been tried. The cable may still function intermittently, but performance is inconsistent. At that stage, the key question is not whether one more repair is possible. It is whether the cable can still be trusted. That is why checking the finished repair properly matters just as much as doing the repair itself.
What Repair Mistakes Cause the Most Trouble Later?
The repair that fails later is often the repair that seemed “good enough” at the time. That is why understanding the most common mistakes helps customers save time and avoid repeat failures.
The problems we see most often are:
- Using the wrong connector for the cable
- Cutting braid strands during stripping
- Damaging the dielectric with a blade
- Leaving stray shield wire near the center conductor
- Crimping with the wrong die size
- Reusing old or damaged connectors
- Repairing a cable section that is already fatigued farther back
- Making multiple repairs on the same short cable until routing becomes poor
Here is how those mistakes usually show up later:
| Repair Mistake | What Happens Later |
|---|---|
| Wrong connector size | Loose fit, poor contact, early failure |
| Damaged braid | More noise, weaker shielding |
| Nicked dielectric | Impedance shift, unstable signal |
| Incorrect strip length | Poor connector seating |
| Bad crimp | Pull-out or intermittent performance |
| Repeated rework | Shorter life and harder routing |
This is one reason why some customers stop repairing after one failed attempt and instead ask for a replacement or custom version. That is usually the right move when the cable is important to system performance, the connector area has already been reworked once or twice, or the assembly must meet a more demanding application than basic continuity alone.
Putting it simply, coax repair works best when the damage is local, the tooling is correct, and the cable still has enough healthy structure left. Once those conditions are no longer true, repair turns into guesswork.
How to Fix Common Coax Cable Problems?
Most coax cable issues show up as system problems first—weak signal, noise, unstable connection—long before anyone points to the cable. Fixing them quickly comes down to identifying the real cause and choosing the right action. In many cases, the fix is simple. In others, the “repair” that looks fine actually makes performance worse.
A practical approach is to start from the symptom, narrow it down to a likely cause, then fix only what needs to be fixed. This avoids unnecessary cutting, re-terminating, or replacing parts that are still good.
How to Fix Signal Loss in Coax Cable?
Signal loss is the most common complaint. It can come from several places: a weak connector, a damaged section, too much cable length, or poor cable quality. The fastest way to handle it is to rule out the easy causes first.
Start with the connectors. In many field cases, replacing a connector restores performance immediately. If that does not help, check for a crushed or sharply bent section. If the cable route is long, compare it with a shorter test cable to see if distance is the main factor.
Use this quick map from symptom to action:
| Symptom | Likely Cause | What to Do |
|---|---|---|
| Signal weak on all channels | Loose or worn connector | Re-terminate or replace connector |
| Signal drops when cable moves | Fatigue near connector | Cut back and install new connector |
| Signal improves with shorter cable | Excess length or loss | Use shorter or lower-loss cable |
| Noise increases near equipment | Poor shielding or grounding | Re-terminate; check braid contact |
| Gradual loss over time | Moisture or material aging | Replace cable |
Two details make a big difference during a fix:
- Keep full braid coverage under the connector body. Gaps reduce shielding and increase noise.
- Match the connector to the cable exactly (OD, dielectric, and center pin). “Close enough” often isn’t.
In many of the coax projects handled by Sino-Conn, many “signal loss” tickets end up being connector issues. Once the correct connector and crimp are used, the cable performs as expected again.
How to Repair a Cut or Damaged Coax Cable?
When a cable is physically damaged, the cleanest repair is to remove the bad section and rebuild the ends. The goal is to avoid leaving hidden damage inside the run.
A straightforward method:
- Cut out the damaged section completely.
- Prepare both cable ends with correct strip dimensions.
- Install new connectors on both sides.
- Join with a suitable adapter (if needed).
- Check continuity and basic signal behavior.
This adds an extra connection point, so there is always a small trade-off. For many systems it is acceptable. For higher-frequency or more sensitive links, keeping connections to a minimum is better.
Here is how different repair options compare:
| Repair Option | What It Involves | Performance Impact |
|---|---|---|
| Re-terminate one end | Replace one connector | Minimal if done well |
| Cut and join with adapter | Two connectors + coupler | Small added loss |
| Multiple joins | Several connectors added | Noticeable loss and instability |
| Tape or patch only | Cosmetic fix | Not reliable |
If the cable is used in a critical path (RF link, antenna feed, high-speed data), it is usually better to keep a single clean run rather than introduce multiple joints. For less sensitive uses, a single coupler repair can be perfectly acceptable.
One thing to avoid is repairing too close to an existing weak point. If the cable has been bent or stressed in a certain area, cut back far enough to reach healthy material before installing a new connector.
How to Avoid Poor Connection or Noise?
Noise and unstable signals are often blamed on the environment, but many times they come from how the cable is terminated or routed.
The most effective fixes are simple, but they need to be done carefully:
- Keep the braid intact and evenly distributed under the connector
- Use the correct connector type for the exact cable
- Avoid sharp bends right next to the connector
- Keep signal cables away from strong power lines when possible
- Ensure connectors are fully seated and not cross-threaded or loose
Here is a quick guide to common noise sources and how to deal with them:
| Noise Source | What It Looks Like | Fix |
|---|---|---|
| Incomplete shielding at connector | Random noise, worse near equipment | Re-terminate with full braid contact |
| Loose connector | Intermittent signal | Tighten or replace connector |
| Poor cable routing | Noise when cables cross power lines | Re-route or increase spacing |
| Damaged braid | Higher baseline noise | Replace affected section |
| Grounding issues | Unstable or fluctuating signal | Check system grounding path |
A simple field check helps: move the cable slightly near the connector. If the signal changes, the problem is usually in the termination area.
Another pattern shows up with repeated quick fixes. If the same cable needs repair again and again, the issue is usually not the last repair—it is that the cable design or routing does not match the application. In those cases, it is more efficient to step back and adjust the cable itself rather than keep fixing the same point.
When customers share photos or short videos of the issue, it becomes much easier to identify whether the problem is in the connector, the cable body, or the installation. That avoids trial-and-error and helps get to a stable solution faster.
The main idea across these fixes is straightforward:
Start with the connectors, check the stressed areas, and avoid adding unnecessary joints. When the cable is still healthy, a clean repair works well. When damage is spread or repeated, replacing the cable or redesigning it is usually the better long-term move.
When Should You Replace Instead of Repair Coax Cable?
Repair can get a system back online quickly, but it is not always the right long-term move. The key question is simple: after the fix, can the cable still be trusted under the same conditions as before? If the answer is uncertain, replacement is usually the safer choice.
In day-to-day work, this decision is rarely about the price of a connector versus the price of a new cable. It is about avoiding repeat failures, downtime, and extra labor. A cable that fails again after a quick repair often costs more than replacing it once with the right structure.
Which Damage Cannot Be Repaired?
Some damage is local and easy to fix. Other damage changes the cable geometry or spreads inside the structure. Those cases are poor candidates for repair because performance cannot be brought back reliably.
Use this table to judge quickly:
| Damage Type | Repairable? | Why |
|---|---|---|
| Worn or loose connector | Yes | Replace connector and re-terminate |
| Clean cut at one end | Yes | Cut back and install new connector |
| Small jacket nick (shield intact) | Sometimes | Seal if no exposure to moisture |
| Crushed or flattened cable | No | Geometry changed → impedance shift |
| Water ingress / corrosion | No | Moisture travels along braid/dielectric |
| Multiple tight-bend points | No | Hidden fatigue across a section |
| Repeated rework at same end | Usually no | Structure already weakened |

Two cases stand out in the field:
- Crushed cable (under a clamp or door): even a slight flat spot can change the spacing between the center conductor and shield. The cable may pass continuity but show higher loss and reflections in use.
- Moisture ingress: once water gets in, it rarely stays in one place. Corrosion can extend beyond what you can see. Cutting off a short section often does not solve it.
If you see either of these, replacement is more predictable than trying to “fix around” the problem.
Is Repair or Replacement More Cost-Effective?
On paper, repair is cheaper. In practice, the total cost depends on how often the problem comes back and how hard it is to access the cable.
Think in terms of total cost, not just parts:
| Cost Element | Repair | Replacement |
|---|---|---|
| Parts | Low (connectors) | Medium (new cable) |
| Labor time | Medium–High (diagnose + rework) | Low (swap) |
| Downtime risk | Higher (repeat issues) | Lower |
| Performance certainty | Varies | Stable |
| Follow-up work | Likely if root cause not removed | Minimal |
Where replacement usually wins:
- Hard-to-access installations (rooftop antennas, inside equipment, long harness runs)
- Production or field systems where downtime is expensive
- High-frequency links where small losses matter
- Repeated repairs on the same cable
A common pattern is to repair during early testing to keep work moving, then replace before final deployment. That way you avoid delays in development but do not carry risk into production.
Customers often ask for a quick check before deciding. A photo of the damage, cable type, and connector is usually enough to give a first recommendation and avoid trial-and-error.
How Long Does a Repaired Coax Cable Last?
There is no single answer because lifespan depends on where the damage was and how the cable is used afterward. A connector-only repair on healthy cable can last close to the original. Repairs on stressed or aged cable are less predictable.
Use these ranges as a guide:
| Repair Situation | Expected Result |
|---|---|
| Single clean re-termination | Near original performance |
| Minor local damage removed | Good, but monitor under use |
| Multiple re-terminations | Reduced life, higher risk |
| Outdoor or moving use after repair | Uncertain, depends on routing |
| Moisture-related issue | Often short-lived even after fix |
Movement matters a lot. If the cable is static after installation, a good repair can be stable for a long time. If the cable flexes during use (drones, test rigs, movable equipment), any previously stressed area is more likely to fail again.
For performance-sensitive systems, it is worth checking the repaired cable under real conditions rather than relying only on a quick continuity check.
Practical Decision Checklist
Before choosing repair or replacement, run through this short list:
- Has this cable already been repaired once or more?
- Is there any sign of crushing, water entry, or multiple bend points?
- Will the repaired section move or be stressed in use?
- Is this link critical for system performance (RF, antenna, data)?
- Is access difficult if it fails again?
If you answer “yes” to several of these, replacement is usually the better call.
When It Makes Sense to Step Back and Redesign
Sometimes the same cable keeps failing in the same place. That is usually not a repair problem—it is a design or routing mismatch.
Typical signs:
- Failures always occur near a tight bend
- Connectors loosen over time in a vibrating setup
- The cable is slightly too thick for the routing space
- The environment (heat, oil, UV) is harsher than expected
In these cases, a custom assembly solves the root cause instead of repeating fixes. Adjustments may include:
- Smaller or more suitable cable OD for the route
- Different connector style or orientation
- Improved strain relief near termination
- Jacket material matched to the environment
- Shorter or cleaner routing to remove excess length
This is where a quick redesign pays off. With a clear drawing and matched components, the cable stops being a weak point in the system.
A simple way to look at it:
- Repair when the problem is local and the rest of the cable is healthy
- Replace when the structure is compromised or the risk of repeat failure is high
- Redesign when the same issue keeps coming back
If you are unsure which path makes sense, sharing a photo, cable type, and where it failed is usually enough to get a practical recommendation and avoid spending time on fixes that will not hold.
Do You Need Custom Coax Cable Instead of Repair?
If a coax cable fails once, repair is a reasonable first step. If it fails again in the same place, the problem is usually not the repair—it is the design or the fit between the cable and the application. That is when it makes sense to stop fixing the same point and look at a cable that actually matches how it is used.
Many customers reach this stage after a few rounds of re-termination. The connector gets replaced, the signal comes back, then a few days or weeks later the same issue returns. The pattern is consistent: the cable is being asked to do something it was not designed for—tight routing, constant movement, outdoor exposure, or a connector that does not quite match.
A custom coax cable does not mean “more complex.” In most cases, it means removing the mismatch so the cable can run without stress.
When Repair Is Not Enough for Your Application?
There are a few clear situations where repair stops being efficient and starts wasting time.
- The failure happens repeatedly at the same location
- The cable is installed in a tight bend or constrained path
- The system involves vibration or frequent movement
- The environment includes heat, oil, UV, or moisture
- The connector keeps loosening or losing contact
- The cable length or routing is not well controlled
In these cases, the root cause is not the last connector you installed. It is how the cable is being used.
Here is a quick way to judge:
| Situation | What Usually Happens with Repair | What Custom Solves |
|---|---|---|
| Tight routing space | Cable bends too sharply, fails again | Smaller OD, better flexibility |
| Repeated motion | Connector fatigue or conductor break | Reinforced structure, strain relief |
| Outdoor exposure | Jacket cracks or moisture enters | Proper material selection |
| Connector mismatch | Loose or unstable connection | Correct connector and dimensions |
| Excess cable length | Clutter, stress points | Exact length definition |
In several projects we’ve seen, customers tried to fix the same RF jumper multiple times. The issue was not the connector—it was that the cable was slightly too stiff for the routing path. Once a softer cable with the same electrical performance was used, the failures stopped.
Which Parts of Coax Cable Can Be Customized?
A coax cable is not just one component. It is a combination of conductor, dielectric, shielding, jacket, and connectors. Adjusting a few of these elements can make a big difference in how the cable performs in real use.
These are the areas that are most often customized:
| Item | What Can Be Changed | Why It Helps |
|---|---|---|
| Cable length | Exact length with tolerance | Reduces excess and routing stress |
| Cable diameter (OD) | Slim or reinforced structure | Fits limited space |
| Connector type | Original or equivalent options | Balances cost and availability |
| Connector orientation | Straight, right-angle, custom | Easier installation |
| Shielding structure | Single, double, braided, foil | Improves EMI performance |
| Jacket material | PVC, TPE, FEP, LSZH | Matches environment |
| Flexibility | Soft or semi-rigid | Adapts to movement |
| Strain relief | Added or reinforced | Extends connector life |
For example:
- In a compact device, reducing OD by even 0.5–1 mm can make installation much easier
- In a moving system, adding proper strain relief can prevent repeated failures at the connector
- In outdoor use, switching from standard PVC to a more suitable material can extend service life significantly
Another point customers often ask about is connector sourcing. Original branded connectors are sometimes required, but they can be expensive or have longer lead times. Equivalent connectors can be used in many cases to reduce cost and speed up delivery, as long as they match the required specifications.
The key is not whether the connector is branded or not. It is whether it fits the cable and the application correctly.
How to Get a Fast Custom Coax Cable Solution?
Custom does not have to mean slow. In many projects, the time spent trying to repair or adapt a standard cable is longer than starting with a correct design.
A typical process looks like this:
| Step | What Happens | Time |
|---|---|---|
| Requirement check | Confirm cable type, connector, use case | Same day |
| Drawing creation | Define structure and dimensions | Within 3 days (often faster) |
| Sample production | Build and test sample | ~2 weeks (2–3 days if urgent) |
| Production | Batch manufacturing | 3–4 weeks |
In many cases, customers do not have a full specification at the beginning. That is normal. It is usually enough to provide:
- A sample cable
- A photo of the cable and connectors
- A part number (if available)
- A short description of the application
From there, the structure can be defined step by step.
This is where working with a manufacturer that understands cable assemblies helps. Instead of guessing, the cable can be built based on how it will actually be used.
How This Helps Reduce Future Problems
Moving from repeated repair to a proper cable solution usually changes two things:
- Fewer failures during use
- Less time spent on troubleshooting
Here is a simple comparison based on typical customer experience:
| Approach | Short-Term Result | Long-Term Result |
|---|---|---|
| Repeated repair | Quick fix | Ongoing issues |
| Standard cable workaround | Works initially | Mismatch shows up later |
| Custom cable | Slightly longer setup | Stable performance |
This is why many OEM and engineering teams switch to custom cables once the design is stable. It reduces uncertainty and makes the system easier to maintain.
If you are seeing the same coax cable problem more than once, it is usually worth stepping back and looking at whether the cable itself is the right fit. A small change in structure, connector, or material can often remove the problem completely instead of fixing it again and again.
Start Your Coax Cable Solution with Sino-Conn
If you are dealing with coax cable issues—whether it is signal loss, repeated repair, or installation problems—it is worth taking a step back and looking at the cable design itself.
In many cases, fixing the same cable repeatedly only delays the real solution.
At Sino-Conn, we focus on:
- Understanding your application
- Identifying the real cause of cable problems
- Providing workable solutions, not just products
You can start with very little information:
- A sample cable
- A photo
- A drawing
- Or just a description of your issue
From there, we can help define:
- The right cable structure
- Suitable connectors
- Material options based on environment
- A solution that balances cost, performance, and lead time
If you are dealing with repeated coax cable failures, send us a photo or sample. In most cases, we can quickly tell whether it should be repaired, replaced, or redesigned—and help you avoid wasting time on repeated fixes.


