Skip to content
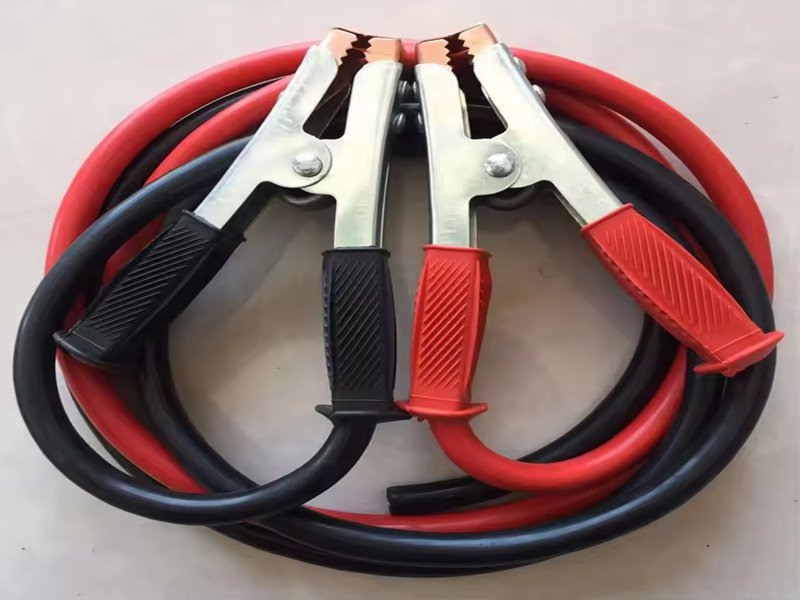
When your car battery dies, it often happens at the worst possible moment — a cold morning before work, a late-night parking lot, or a remote highway with no help in sight. In those moments, one simple tool can turn frustration into relief: jumper cables. Yet, many drivers still misuse them, leading to sparks, damage, or even injury.
Jumper cables may look simple — just two thick wires with metal clamps — but behind that simplicity lies the physics of transferring hundreds of amps between two batteries in seconds. Using them safely requires understanding not just how to connect them, but why each step matters.
To jump a car with jumper cables, connect the red clamp to the dead battery’s positive (+), then the red clamp to the donor’s positive (+). Next, connect the black clamp to the donor’s negative (–), and finally attach the remaining black clamp to an unpainted metal surface on the dead car. Start the working vehicle, then the dead one, and remove cables in reverse order.
By the end of this guide, you’ll not only know how to safely jumpstart your vehicle — you’ll also understand what makes a quality jumper cable assembly, and how Sino-conn designs industrial-grade solutions trusted by professionals worldwide.
What Are Jumper Cables and Why Do You Need Them?
Jumper cables are heavy-duty wires with clamps used to transfer power from a charged vehicle battery to a dead one. They allow a disabled car to start by temporarily sharing current from a functional 12V battery. The quality of the cable — including its thickness, material, and insulation — determines how safely and effectively energy transfers between the two vehicles.
Jumper cables act as a bridge for electric current. When your car battery can’t start the engine (typically due to low charge or cold weather), you can use another vehicle’s battery to deliver a quick burst of power.
Each cable carries hundreds of amps — enough to spin a starter motor that draws 150–600A momentarily. That’s why wire gauge (AWG) and conductor material are so important.
| Cable Gauge (AWG) | Typical Current (A) | Vehicle Type | Material Recommendation |
|---|---|---|---|
| 8 AWG | 150–200 A | Small cars | CCA acceptable |
| 6 AWG | 200–300 A | Sedans, SUVs | Copper preferred |
| 4 AWG | 300–400 A | Large SUV / Pickup | 100% Copper recommended |
| 2 AWG | 400–600 A | Heavy-duty / Truck | 100% Copper only |
Thicker cables (lower AWG numbers) carry more current with less voltage drop — essential in cold climates or for vehicles with large engines.
In short, jumper cables are lifelines for your vehicle’s electrical system, whether for roadside rescue, fleet maintenance, or industrial equipment recovery.
Which Jumper Cables Are Best for Your Vehicle?
The best jumper cables match your vehicle’s size and power needs. For most cars, 4 AWG pure copper cables at least 12–16 feet long provide optimal performance. Larger trucks or diesel engines may require 2 AWG or 1/0 AWG heavy-duty cables. Look for features like XLPE or silicone insulation, nickel-plated clamps, and certifications such as UL, SAE, or ISO to ensure safety, reliability, and long service life.
Picking jumper cables isn’t just about buying the thickest pair you can find — it’s about balancing current capacity, flexibility, and durability to match your specific vehicle type and environment. Whether you drive a compact sedan or manage a commercial truck fleet, the right cable ensures safe, fast starts and prevents damage to both vehicles’ electrical systems.
Understand Conductor Materials: Copper vs. Copper-Clad Aluminum (CCA)
At the heart of every jumper cable is its conductor — the pathway for high current flow.
The choice between pure copper and copper-clad aluminum (CCA) determines both performance and longevity.
| Material | Conductivity | Durability | Weight | Cost | Ideal For |
|---|---|---|---|---|---|
| Pure Copper | Excellent (≈100%) | Long-lasting | Heavier | Higher | Professional & OEM use |
| Copper-Clad Aluminum (CCA) | Moderate (≈60–70%) | Medium | Lighter | Lower | Budget or light-duty use |
Pure copper cables offer minimal resistance, superior flexibility, and consistent voltage even in cold weather. They’re ideal for frequent users, mechanics, or fleet operators.
CCA cables, while cheaper, can overheat during extended use and lose efficiency over time. They are suitable only for occasional emergency use.
Sino-conn recommends 100% copper conductors for all professional or OEM jumper cable assemblies, ensuring maximum current delivery with minimal energy loss.

2. Determine the Correct Wire Gauge (AWG)
Cable thickness directly determines how much current it can carry.
Lower AWG numbers = thicker wire = higher current capacity.
| Vehicle Type | Recommended Gauge (AWG) | Typical Starting Current (A) | Cable Use |
|---|---|---|---|
| Compact Car / Sedan | 6 AWG | 200–300 A | Everyday use |
| SUV / Light Truck | 4 AWG | 300–400 A | Reliable for cold starts |
| Heavy Truck / Diesel | 2 AWG | 400–600 A | Heavy-duty power transfer |
| Bus / Industrial Machine | 1/0 or 2/0 AWG | 600–800 A | Professional-grade or 24V systems |
Tip: Choose one size thicker than you think you need if you live in cold climates or often jump vehicles with larger engines. Thicker cables reduce voltage drop and improve efficiency.
3. Choose the Right Cable Length
Cable length determines convenience — but longer cables increase resistance slightly.
| Length | Best For | Pros | Cons |
|---|---|---|---|
| 10 feet | Small cars | Compact, low resistance | Limited reach |
| 12–16 feet | Sedans & SUVs | Balanced flexibility | Standard for most users |
| 20+ feet | Trucks or rescue use | Great reach | Slight voltage drop |
For home users, 12–16 feet offers the perfect balance.
For roadside assistance, 16–20 feet allows connection even when vehicles can’t park nose-to-nose.
At Sino-conn, custom jumper cables can be produced at any length — from short, portable kits to extra-long rescue-grade assemblies.
4. Evaluate Insulation Material and Flexibility
Insulation protects the conductor from heat, oil, moisture, and abrasion.
The insulation quality often determines how a cable performs in real-world conditions.
| Insulation Material | Temperature Range | Flexibility | Durability | Recommended For |
|---|---|---|---|---|
| PVC | -20°C to +70°C | Medium | Basic protection | Light-duty use |
| XLPE | -40°C to +125°C | Good | Excellent thermal stability | Automotive & fleet |
| Silicone Rubber | -60°C to +200°C | Excellent | Premium weather resistance | Extreme climates & marine use |
Sino-conn uses XLPE or silicone for professional-grade jumper cables, ensuring flexibility even in freezing temperatures and durability against engine heat and oil exposure.
5. Check Clamp Design and Build Quality
The clamps are the “hands” of your jumper cables — poor contact here can cause arcing or insufficient current transfer.
What to look for:
- Solid metal jaws (not thin stamped metal)
- Copper or nickel plating for conductivity and corrosion resistance
- Strong spring tension for secure grip
- Fully insulated handles for safety
- Serrated teeth for reliable contact on corroded terminals
Advanced models from Sino-conn include replaceable clamp ends, integrated fuses, or reverse-polarity protection circuits to enhance user safety — especially for modern vehicles with sensitive ECUs.
6. Look for Industry Certifications and Standards
For maximum reliability, jumper cables should comply with recognized electrical and environmental standards.
| Certification | Meaning | Why It Matters |
|---|---|---|
| UL / SAE | Tested for electrical safety and fire resistance | Ensures stable performance |
| ISO9001 | Quality management system | Guarantees production consistency |
| RoHS / REACH | Environmentally safe materials | Safe for users and compliant for export |
| PFAS, COC, COO | Specialized compliance documents | Required for industrial and OEM clients |
Sino-conn’s cables undergo rigorous internal and third-party testing to verify conductor resistance, insulation integrity, and clamp performance under load.
7. Match Cable Type to Application
Different environments require different cable configurations:
| Application | Recommended Features |
|---|---|
| Passenger Car / SUV | 4 AWG, 12–16 ft, pure copper |
| Commercial Truck / Diesel | 2 AWG or 1/0 AWG, XLPE insulation |
| Marine / Outdoor | Silicone insulation, anti-corrosion clamps |
| Portable Jump Starter | Compact short cable with safety fuse |
| Fleet or Garage Use | Long 20 ft cable with professional clamps |
Sino-conn provides custom-built jumper cable assemblies for automotive, marine, military, and industrial sectors — combining the right materials, safety systems, and ergonomic design for each use case.
8. Why Cheap Cables Often Fail
Low-cost cables frequently compromise on conductor thickness, insulation quality, or clamp design.
Common issues include:
- Voltage drop (slow or failed jump-starts)
- Overheating during use
- Clamp corrosion or breakage
- Stiffness in cold weather
While they may work once or twice, these cables often fail when you need them most. Investing in high-quality, UL-certified cables ensures reliability and long-term value.
9. Sino-conn’s Recommendation: Professional-Grade Jumper Cables
For consistent, safe performance across all conditions, Sino-conn recommends:
- Conductor: 100% pure copper, multi-stranded
- Gauge: 4 AWG for sedans, 2 AWG for trucks, 1/0 AWG for heavy-duty use
- Length: 12–16 ft standard, up to 20 ft for professional use
- Insulation: XLPE or silicone
- Clamps: Nickel-plated, high-tension, insulated handles
- Optional: Fuse protection or reverse-polarity module

Every Sino-conn jumper cable assembly is custom-engineered, tested, and certified for the application’s current, temperature, and mechanical requirements.
10. Summary Table — Choosing the Right Jumper Cables
| Vehicle Type | Gauge | Material | Insulation | Length | Certification | Ideal For |
|---|---|---|---|---|---|---|
| Compact Car | 6 AWG | CCA | PVC | 10–12 ft | UL | Emergency use |
| Sedan / SUV | 4 AWG | Copper | XLPE | 12–16 ft | UL / ISO | General use |
| Truck / Van | 2 AWG | Copper | XLPE | 16–20 ft | UL / RoHS | Fleet / workshop |
| Diesel / Heavy Machinery | 1/0 AWG | Copper | Silicone | 16–25 ft | SAE / ISO | Industrial |
| Marine / Outdoor | 4 AWG | Copper | Silicone | 15–20 ft | REACH / RoHS | Corrosive / cold areas |
Sino-conn Insight: Custom Engineering for Real-World Demands
As an OEM cable manufacturer, Sino-conn provides fully customizable jumper and battery cable assemblies — from conductor and clamp selection to insulation material and packaging design.
Each project begins with a CAD drawing and technical review to ensure current, temperature, and mechanical specifications meet the client’s exact standards. With 30-minute to 3-day drawing turnaround, no MOQ, and 100% inspection, Sino-conn ensures both flexibility and industrial reliability.
For engineers, OEMs, or fleet buyers, choosing Sino-conn means more than just getting cables — it means securing a professional-grade energy transfer system tailored to your vehicles.
How to Jump a Car Battery Step by Step
Park the vehicles close (but not touching), turn both ignitions off, and attach jumper cables in this order: red to dead +, red to donor +, black to donor –, black to an unpainted metal ground on the dead car. Start the donor, wait 3–5 minutes, then start the dead car. If it starts, remove cables in reverse order and let the revived vehicle run or drive to recharge the battery.
Jump-starting a car correctly is part procedure and part respect for basic electrical safety. When done properly you restore a disabled vehicle quickly and safely; done incorrectly you risk sparks, damaged electronics, or a ruined alternator. The following detailed guidance gives you the practical “how” and the technical “why” so you can act confidently.
First, verify both vehicles are compatible (both 12-volt systems unless you have 24V-rated gear) and that there’s no obvious damage (leaking battery acid, cracked case). Use a good set of jumper cables — ideally copper, 4 AWG for most passenger cars and 2 AWG for larger engines — and wear protective gloves and eyewear. Clean, tight clamp contacts are critical: corrosion or loose jaws increase resistance, make the jump less effective, and can create dangerous heat or arcing.
Positioning matters: park nose-to-nose or side-by-side with enough space to open hoods, but do not let the vehicles touch (metal-to-metal contact would create a direct short). Turn off electronics (radios, climate control, lights) and both ignitions. Put both vehicles in park (or neutral for manuals) and set parking brakes.
Attach the clamps in the safe, proven sequence (red–red first, black to donor negative, last black to ground on dead car) to minimize sparks near the battery where hydrogen gas can be present. Start the donor vehicle and allow it to idle for a few minutes — typically 3–5 minutes — so its alternator raises the system voltage and pushes current into the weak battery. If the dead car doesn’t start after a few attempts, avoid continuous cranking (which can damage the starter). Instead, wait longer or let the donor run at 1,500–2,000 RPM briefly to provide higher charging current, then try again.
If the vehicle starts, keep it running. A healthy alternator will charge the battery at roughly 13.8–14.4 V. Allow the revived car to idle for 10–15 minutes or drive for 15–30 minutes to let the alternator restore charge. If the car fails to hold a charge after driving, the battery may be at end-of-life or there may be an alternator/fuse issue — get it checked.
Finally, disconnect in reverse order to avoid sparks: black from the grounded metal, black from donor, red from donor +, then red from revived vehicle +. Store cables properly and inspect them for wear. For modern vehicles with sensitive ECU and electronics, consider smart jumper cables or a fused jump pack to reduce risk of voltage spikes. If you’re a commercial buyer or fleet manager, Sino-conn can supply custom jumper cable assemblies with integrated protection and tested conductor specs suited to your vehicles.

What Is the Proper Way to Jump a Car with Jumper Cables?
The proper method is methodical and safety-first. Use high-quality cables, park safely, and ensure both ignitions and accessories are off. Clean terminal connections if needed. Follow the recommended clamp sequence to keep sparks away from the battery: positive on dead, positive on donor, negative on donor, last negative to an unpainted metal ground on the dead vehicle (not the negative terminal). Start the donor, give 3–5 minutes of charging, then attempt to start the dead car. If it starts, let it run to charge; if not, stop and reassess (battery, cables, or alternator problem). Never let clamps touch once connected.
What Are the 5 Steps to Jumpstart a Car?
- Position & Prepare: Park donor vehicle within cable reach, both engines off, parking brakes on, hoods open. Turn off electronics.
- Identify Terminals: Find positive (+, red) and negative (–, black). Clean if necessary.
- Attach Cables in Correct Order: Red to dead + → Red to donor + → Black to donor – → Black to a grounded metal point on the dead car.
- Start & Charge: Start the donor car and idle 3–5 minutes (or briefly rev to ~1,500–2,000 RPM if needed), then attempt to start the dead car.
- Disconnect & Recharge: If started, disconnect in reverse order and let the revived vehicle run 10–30 minutes to recharge.
These five steps minimize spark risk and ensure maximum safe current flow.
What Is the Correct Order to Attach Jumper Cables?
Correct order reduces spark risk and improves safety:
- Red → Dead battery positive (+).
- Red → Donor battery positive (+).
- Black → Donor battery negative (–).
- Black → Unpainted metal ground (chassis/engine block) on the dead vehicle — not the negative terminal.

Why ground last? Batteries emit hydrogen gas. Attaching the last negative to a metal grounding point away from the battery minimizes chance of a spark directly at the battery surface, where ignition of gas could cause an explosion. Ensure clamps have firm contact and don’t slip onto nearby plastic or painted surfaces.
When and How to Disconnect Safely
Disconnect only after the revived vehicle is running normally. Remove clamps in reverse order of attachment:
- Black from grounded metal on dead car.
- Black from donor negative.
- Red from donor positive.
- Red from revived car positive.
Do this while both engines remain running (or at least the revived engine running) to avoid drawing starter power back through the cables. Keep clamps from touching each other or any metal during removal. Afterwards, let the revived vehicle idle 10–15 minutes or drive 15–30 minutes to give the alternator time to recharge the battery. If the car dies again soon after, the battery likely needs replacement or alternator service.
Troubleshooting: If the Car Won’t Start or Sparks Appear
If it won’t start after proper procedure: stop cranking to avoid starter damage. Check cable connections for corrosion or loose grip; clean terminals and reattach. Try allowing the donor to charge longer (5–10 minutes), or briefly increase donor RPM to raise alternator output. If you see persistent sparks near the battery, immediately disconnect — sparks near a battery smell of hydrogen gas or poor contact. If the revived car starts but dies quickly, suspect a failing alternator (voltage under 13.5 V). Use a multimeter if available: a healthy idle charging voltage reads around 13.8–14.4 V. For modern vehicles, avoid repeated jump attempts — consult a technician, as ECU damage or advanced charging systems can complicate a simple jump-start.
What Safety Rules Should You Always Follow?
Always connect red to positive, black to ground, avoid sparks or flammable areas, and never let clamps touch. Use fused or smart jumper cables for vehicles with sensitive electronics.
- Polarity matters. Reversing cables can damage alternators or ECUs.
- Avoid touching clamps together once connected.
- Keep away from belts, fans, and moving parts.
- Do not jump-start electric vehicles — their batteries are high-voltage and require specialized tools.
- Inspect regularly. Frayed cables or rusty clamps can overheat or fail.
Modern vehicles include sensitive electronic control units (ECUs). Sino-conn recommends reverse-polarity protection or smart jumper cables with built-in safety modules to prevent power surges.
Are There Better Alternatives to Traditional Jumper Cables?
Portable jump starters and smart cables with built-in protection circuits are safer and easier alternatives. However, heavy-duty copper jumper cables remain the most reliable solution for cold weather or fleet use.
Portable Jump Starters
Compact lithium jump packs are convenient but limited in power output. Perfect for small cars, less ideal for trucks or industrial machinery.
Smart Jumper Cables
Include safety chips that detect reversed polarity, voltage spikes, and overcurrent. These are ideal for modern cars with ECUs.
Heavy-Duty / Marine Grade
For trucks, boats, and machinery — Sino-conn’s marine-grade cables feature anti-corrosion plating and XLPE insulation, built to withstand moisture, salt, and vibration.
24V Systems
Industrial or military vehicles often require 1/0 or 2/0 AWG 24V-rated cables. Sino-conn provides custom assemblies rated for up to 600A continuous current.
How Does Sino-conn Provide Professional Jumper Cable Solutions?
Sino-conn specializes in custom battery cable assemblies — offering pure copper conductors, UL-certified materials, 100% inspection, and fast prototyping for global OEMs and distributors.
1. Engineering-Grade Customization
Sino-conn designs each jumper or battery cable to your exact specifications — length, gauge, insulation, connectors, protection circuits, and even custom branding.
2. Speed and Flexibility
- Samples: 2–3 days for urgent cases, 1–2 weeks standard
- Mass Production: 2–4 weeks typical
- Drawings: CAD to PDF within 30 minutes–3 days
3. Quality and Certification
Every cable undergoes three-stage inspection (in-process, completion, pre-shipment) and complies with UL, ISO, RoHS, REACH, PFAS, COC, and COO standards.
4. Pricing Strategy
Sino-conn offers OEM, distributor, and brand-tier pricing, balancing cost with performance. Whether you need genuine or equivalent connectors, Sino-conn delivers flexible sourcing and global shipping.
5. Global Trust
Engineers, fleet operators, and OEMs from Europe, North America, Japan, and Southeast Asia rely on Sino-conn for consistent quality and technical support.
Conclusion:
Jumping a car isn’t just about getting from point A to B — it’s about having the right tools made with the right materials. A reliable jumper cable can mean the difference between a quick rescue and a damaged electrical system.
Sino-conn doesn’t just make cables — we engineer lifesaving connections.
Whether you’re an OEM, distributor, or end user, our team can design, prototype, and deliver custom jumper cable assemblies that meet your exact needs.
Ready to build your perfect cable?
Contact Sino-conn today for a free consultation, custom design quote, or sample request.
Sino-conn — Your trusted partner in high-performance cable assemblies.