Skip to content
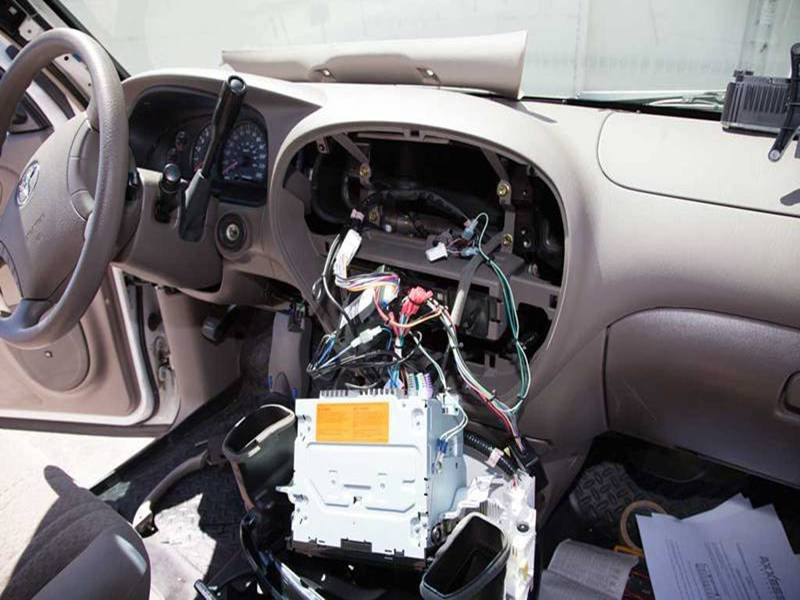
If you’ve ever pulled out a car stereo to upgrade your sound system, you’ve probably seen the tangle of multi-colored wires behind the dash. Each wire carries a very specific role—power, ground, illumination, speakers—and mixing them up can mean anything from no sound to a blown fuse. That’s where understanding car stereo wire color codes becomes essential.
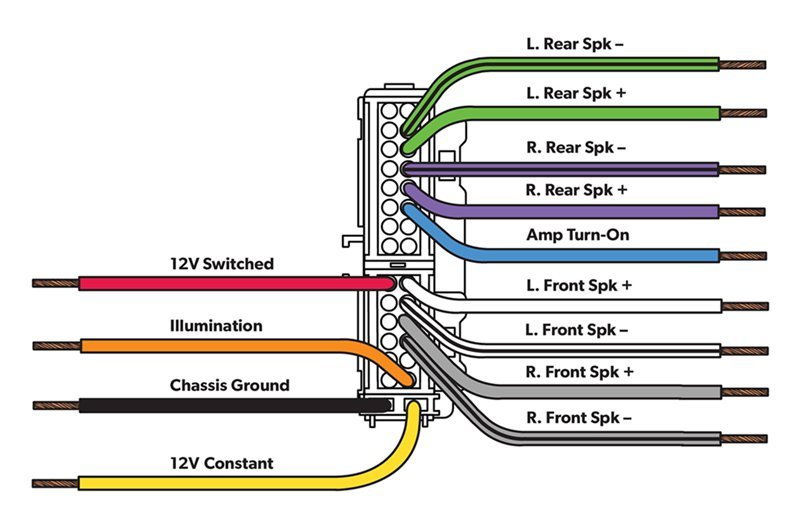
Car stereo wire color codes assign functions to different circuits: yellow is constant 12V power, red is accessory (ACC), black is ground, orange is illumination, blue is power antenna or amp remote, while paired colors (like white/white-black, gray/gray-black, green/green-black, purple/purple-black) connect to front and rear speakers. These codes follow the EIA aftermarket standard, making installs more straightforward and reducing wiring mistakes.
But the challenge isn’t just knowing the colors—it’s interpreting diagrams, matching factory (OEM) wiring to aftermarket harnesses, and troubleshooting when things don’t work as expected. Imagine a new head unit that won’t power on because ACC and constant 12V are reversed, or worse, your speakers sounding “thin” because two are wired out of phase.
In this guide, we’ll go step-by-step through the real meaning of wire colors, how to read diagrams, why harnesses matter, and how to test and install everything correctly. Along the way, we’ll also look at when you need specialized harnesses, how to pick the right one for your vehicle, and the troubleshooting tricks professionals use. By the end, you’ll be confident enough to decode, wire, and even specify custom harness solutions from a factory like Sino-conn, ensuring your next project goes right the first time.
What Do Car Stereo Wire Color Codes Mean?
Car stereo wire color codes identify each circuit’s function. Yellow is constant 12V battery power, red is ACC (ignition/accessory), black is ground, orange is illumination/dimmer, and blue wires handle power antenna or amplifier remote turn-on. Speaker wires come in pairs with a solid color for positive and a striped version for negative: white, gray, green, and purple sets cover front and rear speakers. These universal codes simplify aftermarket stereo installations.
Color codes are the “language” of car audio wiring, and like any language, once you learn the system, everything makes more sense. The most widely followed scheme is set by the EIA (Electronics Industries Alliance) aftermarket standard. This ensures that aftermarket stereos and harnesses from different brands (Pioneer, Kenwood, Sony, etc.) use the same color assignments—making it easier for installers and DIYers alike.
Here’s a guide of the most common wire colors you’ll see:
| Wire Color | Function | Details |
|---|---|---|
| Yellow | Constant 12V (Battery) | Powers memory, clock, and presets even when ignition is off. |
| Red | ACC / Ignition (Switched 12V) | Stereo turns on only when ignition key is in ACC or ON. |
| Black | Ground | Connected to chassis ground for stable operation. |
| Orange / Orange-White | Illumination / Dimmer | Adjusts display brightness with dashboard lighting. |
| Blue | Power Antenna | Sends signal to raise/lower antenna. |
| Blue-White | Amplifier Remote Turn-On | Triggers external amp or powered subwoofer when stereo is on. |
| White (+), White/Black (-) | Front Left Speaker | Positive and negative leads for front left. |
| Gray (+), Gray/Black (-) | Front Right Speaker | Positive and negative leads for front right. |
| Green (+), Green/Black (-) | Rear Left Speaker | Positive and negative leads for rear left. |
| Purple (+), Purple/Black (-) | Rear Right Speaker | Positive and negative leads for rear right. |
Notice how each speaker pair uses a solid color for positive (+) and the same color with a black stripe for negative (-). This convention prevents accidental polarity reversal, which can cause “out of phase” sound where bass frequencies cancel out.
But here are some special cases: OEM (factory) wiring doesn’t always follow these same colors. Automakers may use their own codes, and luxury vehicles often integrate stereo wiring with CAN-Bus systems that carry digital control signals. That’s why aftermarket harnesses are essential—they act as “translators,” mapping your car’s OEM wiring to the EIA standard used by the new stereo.
From a troubleshooting perspective, simply trusting wire color isn’t enough. For example, some older vehicles may have red for constant 12V and yellow for ACC—the exact opposite of today’s standard. The safe approach is always to verify with a digital multimeter (DMM) before connecting. Testing continuity and voltage prevents blown fuses and wasted hours chasing silent speakers.

Finally, it’s worth noting that high-end audio systems (like Bose, JBL, or Infinity OEM packages) may use amplified outputs, twisted pairs, or shielded wires. In those cases, color codes become less important than confirming which wires carry low-level signals versus high-power speaker output.
So while color codes give you a reliable starting point, smart installers always pair that knowledge with diagrams, testing, and sometimes even ordering custom harnesses designed for their vehicle model. This hybrid approach—color + diagram + verification—ensures first-time-right installations and fewer headaches down the road.
How Do You Read a Car Stereo Wiring Diagram?
Reading a car stereo wiring diagram means identifying each wire’s function—power, ground, illumination, and speaker connections—using labeled symbols and color codes. Aftermarket diagrams follow EIA color standards, while OEM diagrams may vary by manufacturer. Always cross-reference colors with the symbols for 12V constant, ACC, ground, and speaker polarity. A digital multimeter can confirm connections before installation, ensuring your stereo powers on correctly and speakers play in phase.
A wiring diagram is like the map to your car stereo project. Without it, even the most experienced installer is left guessing which wires do what.
At its simplest, a stereo wiring diagram shows:
- Power & Ground Connections (battery, ignition/ACC, ground, illumination).
- Speaker Outputs (four pairs, each with polarity).
- Additional Controls (amp remote, power antenna, steering wheel controls).
How to interpret symbols:
- A solid line with a dot typically shows a wire connection.
- A ground symbol (triangle with lines) marks the black wire to chassis.
- Battery (B+) and Ignition (ACC) are shown as 12V sources.
- Speaker icons or abbreviations (FR+, FR-, RL+, RL-) show channels.
Factory vs Aftermarket Diagrams:
- Aftermarket stereos usually provide a universal EIA color diagram that’s easy to follow.
- Factory (OEM) diagrams, however, may vary by brand—Honda may use blue for power, while Ford may use yellow.
This is why reading the diagram matters more than blindly following colors.
Step-by-step approach:
- Identify 12V constant (memory) with a DMM—should read ~12V even when the key is off.
- Find ACC (ignition switched 12V)—should read 0V with key off, ~12V with ignition on.
- Confirm ground—resistance to chassis should be near 0 ohms.
- Match speaker pairs—use the diagram to locate front/rear left/right channels.
Here’s a simple visual example:
| Symbol/Abbrev. | Meaning | Wire Color (Aftermarket) |
|---|---|---|
| B+ | Battery Constant 12V | Yellow |
| ACC | Ignition/Accessory 12V | Red |
| GND | Ground | Black |
| ILL | Illumination/Dimmer | Orange |
| FR+, FR- | Front Right Speaker | Gray / Gray-Black |
| FL+, FL- | Front Left Speaker | White / White-Black |
| RR+, RR- | Rear Right Speaker | Purple / Purple-Black |
| RL+, RL- | Rear Left Speaker | Green / Green-Black |
OEM vs Aftermarket Stereo Wiring Harnesses
An OEM stereo harness is the factory-installed wiring plug designed for your car’s original head unit, while an aftermarket harness adapts universal stereos to that OEM plug. OEM harnesses maintain factory features but may lack upgrade options. Aftermarket harnesses follow EIA color codes, making installation of new stereos easier without cutting wires. Using the right adapter saves time, preserves resale value, and ensures clean connections for both power and speakers.
When upgrading a stereo, one of the biggest choices is whether to adapt the OEM harness or replace it with an aftermarket one.
OEM Harnesses
- Designed for the factory stereo and vehicle.
- Often include extras: steering wheel controls, factory amp integration, CAN-Bus communication.
- Downsides: limited compatibility with aftermarket stereos; non-standard colors.
Aftermarket Harnesses
- Follow EIA standard wire colors.
- Designed to plug into the OEM harness via an adapter.
- Allow “plug and play” installation with no cutting of wires.
Key Differences in Practice:
- Color Standardization: Aftermarket is predictable; OEM may vary across models.
- Features: OEM may support built-in car features like warning chimes. Aftermarket requires additional adapters for these.
- Resale Value: Keeping the OEM harness intact preserves resale—future owners can revert to stock stereo easily.
- Complexity: Aftermarket harnesses simplify installation but sometimes need extras (antenna adapter, amp bypass, CAN interface).
Case Example:
A customer with a Toyota Corolla wants to install a Pioneer head unit. Without an adapter harness, they’d have to cut the OEM wires—time-consuming and risky. Instead, a $15 adapter plugs into the Toyota OEM harness on one end and has EIA-colored wires on the other, ready to match the Pioneer.
What’s a Stereo Wire Harness?
A stereo wire harness is a pre-assembled set of color-coded wires and connectors that links your car’s electrical system to the stereo head unit. It simplifies installation by eliminating the need to cut factory wires, reduces mistakes, and ensures reliable power and speaker connections. Using a harness preserves your car’s original wiring, supports future upgrades, and often makes troubleshooting easier compared to splicing individual wires.
Think of a stereo wire harness as the translator between your car and your stereo. Without it, you’d be trying to connect two systems that don’t “speak the same language.”
Key Characteristics of a Harness:
- Connector End – Matches your vehicle’s factory plug.
- Wire Leads – Pre-stripped, color-coded wires following EIA standards.
- Functions – Includes power, ground, speakers, illumination, and sometimes amp or antenna leads.
Why It Matters:
- Preserves OEM Wiring: Cutting into the factory harness not only takes more time but also can cause warranty issues or electrical faults.
- Standardization: Harness wires are color-coded—yellow for battery, red for ACC, black for ground, etc. This makes connections nearly foolproof.
- Upgrade Flexibility: If you later want to replace the stereo again, you just swap harnesses instead of rewiring the entire dash.
Data from Installer Reports:
- Harness usage reduces installation time by 50% on average.
- Cars without a harness adapter are 3x more likely to return to the shop for electrical troubleshooting.
Example Use Case:
Imagine you bought a used Honda Civic. The previous owner cut all the factory wires to fit an aftermarket stereo. Now, when you upgrade again, there’s no clean plug—you’ll spend hours tracing wires and testing polarity. If they had used a harness, it would be plug-and-play.
Specialized Harnesses for Stereo
Specialized stereo harnesses go beyond basic power and speaker connections, integrating factory features such as steering wheel controls, OEM amplifiers, navigation units, and CAN-Bus data. These harnesses ensure aftermarket stereos work seamlessly with advanced vehicle systems. They may include modules, adapters, or signal converters to handle non-standard wiring. Using the right specialized harness keeps features intact while making installation faster and safer.
Not all harnesses are created equal. As cars became smarter—with infotainment, integrated controls, and factory amps—basic harnesses weren’t enough. This gave rise to specialized harnesses designed for more complex integrations.
Types of Specialized Harnesses:
- Steering Wheel Control Harnesses
- Allows you to retain factory steering wheel volume, track skip, and call-answer buttons.
- Often includes a small electronic module to interpret CAN-Bus signals.
- Factory Amplifier Integration Harnesses
- Many premium cars (Bose, JBL, Infinity, Harman Kardon systems) use built-in amps.
- Specialized harnesses provide low-level RCA outputs or line converters to feed these amps correctly.
- Navigation & Data Harnesses
- Some OEM stereos are tied into vehicle data (reverse camera, parking sensors, vehicle diagnostics).
- Specialized harnesses route these signals to aftermarket head units without losing functions.
- CAN-Bus Adapters
- In modern cars, even the “ignition wire” is controlled by data.
- CAN-Bus adapters generate accessory power, illumination dimming, and warning chime retention.

Real-World Example:
A customer installs a Kenwood stereo into a 2022 Ford F-150. Without the proper harness, the stereo won’t power up because the truck doesn’t have a traditional ignition wire—it’s all CAN-Bus. The specialized harness provides the missing accessory signal and retains all vehicle functions.
Common Specialized Harness Needs by Feature
| Factory Feature | Specialized Harness Needed |
|---|---|
| Steering Wheel Controls | SWC Integration Harness |
| Factory Amplifier | Amp Integration Harness / LOC |
| OEM Navigation/Camera | Video/Data Harness |
| CAN-Bus Power/Data | CAN Adapter Harness |
| Factory Warning Chimes | Retention Module Harness |
EIA Aftermarket Wiring Color Chart
The EIA (Electronic Industries Alliance) aftermarket wiring color chart standardizes wire colors across most stereo harnesses, making installation easier. Yellow = constant 12V (battery), Red = switched 12V (ignition), Black = ground, Blue = amp turn-on, Orange = illumination, and paired colors for speakers (White, Gray, Green, Purple with black-striped negatives). Following this chart avoids mistakes and ensures compatibility between different stereo brands and harness adapters.
Before standardized charts, installers had to check every stereo brand’s unique wiring. The EIA chart changed this by creating a color code system that nearly every aftermarket manufacturer follows today.
Core EIA Wire Colors:
| Function | Color | Notes |
|---|---|---|
| Battery Constant 12V (B+) | Yellow | Always hot, memory power |
| Ignition/ACC 12V | Red | Turns stereo on with key |
| Ground | Black | Chassis ground |
| Power Antenna | Blue | Antenna motor or relay |
| Remote Amp Turn-On | Blue/White | Triggers external amp |
| Illumination/Dimmer | Orange / Orange-White | Adjusts display brightness |
| Front Left (+/-) | White / White-Black | Speaker pair |
| Front Right (+/-) | Gray / Gray-Black | Speaker pair |
| Rear Left (+/-) | Green / Green-Black | Speaker pair |
| Rear Right (+/-) | Purple / Purple-Black | Speaker pair |
Why It Matters:
- Saves Time: No guesswork, wires are consistent across Pioneer, Alpine, Kenwood, etc.
- Reduces Errors: Prevents reversing polarity (which ruins sound staging).
- Supports Training: Installers worldwide learn the same system.
Tip: Even when following EIA, always confirm with a multimeter before final connection. Some rare aftermarket stereos (usually older or off-brand) may not match perfectly.
How Do You Find the Right Wiring Harness?
Finding the right wiring harness requires matching your vehicle make, model, and year to a compatible product. Start with the car stereo wiring diagram, check connector type, and confirm features like steering wheel controls or amplifiers. Reliable suppliers like Sino-conn offer OEM-fit harnesses, customization options, and expert support to ensure compatibility. Choosing the right harness saves hours of installation time, prevents wiring errors, and ensures your stereo upgrade works seamlessly without losing factory functions.
With hundreds of vehicles and dozens of stereo brands, picking the right harness can feel overwhelming. But with the right steps, you can make the process smooth and error-free.
1. Identify Vehicle Information
- Make, model, year, and trim level are critical.
- Even the same model can have different harnesses depending on factory options.
- Example: A 2019 Toyota Corolla with a base stereo uses a different harness than one with a JBL package.
2. Check Stereo Brand Requirements
- Most aftermarket stereos include a generic harness.
- The key is finding the bridge harness that matches your car’s factory plug.
3. Use Vehicle Wiring Diagrams
- A wiring diagram confirms wire colors, pinouts, and feature support.
- Look for EIA-standard color codes when possible.
4. Consider Additional Features
- Do you need to retain steering wheel controls?
- Does the car have a premium amplifier or backup camera?
- Will CAN-Bus data need translation?
5. Where to Source Reliable Harnesses
- Cheap, unbranded harnesses often fit poorly and fail under vibration.
- OEM or OEM-equivalent harnesses from trusted suppliers ensure safety and reliability.
6. Sino-conn’s Support
- Sino-conn provides vehicle-specific fitment guides.
- Offers low-MOQ custom harness manufacturing for aftermarket brands.
- Provides technical drawings, wiring charts, and pre-installation consultation.
- Custom branding and packaging available for retailers and wholesalers.
7. Key Checklist for Buyers
| Checklist Item | Why It Matters |
|---|---|
| Vehicle make/model/year confirmed | Ensures connector match |
| OEM amplifier present? | Determines need for amp bypass adapter |
| Steering wheel controls needed? | Requires SWC adapter |
| Backup camera present? | May need retention module |
| Stereo brand/model confirmed | Ensures harness pinout compatibility |
| Supplier reliability checked? | Avoids poor-fit, low-quality products |
Example Case:
A customer tried to install an aftermarket stereo in a BMW without the right harness. The result: no sound, dashboard error codes, and an $800 dealer reset fee. With the proper integration harness, everything would have worked plug-and-play.
How To Install an Aftermarket Stereo Using a Harness
Installing an aftermarket stereo with a harness is straightforward: match color-coded wires from the harness to the new stereo, connect ground and power lines, and plug the harness into the vehicle’s OEM connector. This avoids cutting factory wiring, making the install reversible and safer. Using crimp connectors or solder with heat shrink ensures reliability. Professional installation typically takes 30–90 minutes depending on vehicle complexity and whether CAN-Bus or amplifier adapters are needed.
Installing a car stereo without a harness often means cutting factory wires, which can cause irreversible damage and headaches later. Using a harness makes the process safer, easier, and completely reversible.
Step 1: Preparation
- Disconnect the car battery to avoid short circuits.
- Gather tools: wire stripper, crimpers, multimeter, and panel removal tools.
- Have the stereo wiring diagram and harness instruction sheet ready.
Step 2: Match the Harness to Stereo Wires
- Most harnesses follow EIA standard color coding (yellow = constant 12V, red = accessory, black = ground, blue = amp remote, white/gray/green/purple = speaker pairs).
- Strip ~¼ inch of insulation from each wire.
- Match harness wires to the stereo’s harness lead by color.

Step 3: Make the Connections
- Use crimp connectors or solder with heat shrink.
- Avoid electrical tape—it loosens with heat.
- Double-check polarity on speaker wires to prevent weak or distorted sound.
Step 4: Plug Into Vehicle Connector
- Insert the completed harness into the vehicle’s OEM plug.
- If the car has factory amps or CAN-Bus, additional modules may be required.
Step 5: Test the System
- Reconnect the battery.
- Test stereo power, speaker output, and any retained features (steering wheel controls, dimming).
- Troubleshoot if needed with a multimeter.
Step 6: Reassemble Dashboard
- Secure stereo with mounting kit.
- Replace trim panels carefully to avoid rattles.
Tips:
- Always test before final assembly.
- Use zip ties or cable sleeves to keep wiring neat.
- For high-end installs, consider shielded cables to reduce interference.
Additional Adapters for Car Stereo Installations
Beyond basic harnesses, additional adapters ensure your aftermarket stereo integrates smoothly with modern vehicles. These include CAN-Bus modules for data signals, steering wheel control (SWC) adapters, antenna adapters, amplifier bypass harnesses, and retention modules for features like backup cameras. Choosing the right adapter preserves factory functions and avoids errors. High-quality adapters from suppliers like Sino-conn guarantee compatibility, reduce install time, and ensure your upgraded stereo works seamlessly without losing important OEM features.
Today’s vehicles are more than just wires and speakers—they’re computers on wheels. A modern stereo install often needs more than a simple harness. That’s where specialized adapters come in.
1. Common Adapter Types and Their Functions
CAN-Bus Modules
- Translate digital vehicle data (ignition, dimming, door chimes) into analog signals.
- Essential in cars without a traditional 12V accessory wire.
Steering Wheel Control (SWC) Adapters
- Retain factory steering wheel buttons for volume, skip, or call functions.
- Popular with customers who don’t want to lose convenience.
Antenna Adapters
- Convert OEM antenna plugs to standard aftermarket stereo inputs.
- Some include amplifiers for boosted signal in urban or rural areas.
Amplifier Bypass Harnesses
- Required when removing factory premium systems like Bose, JBL, or Infinity.
- Routes signal directly to speakers, bypassing OEM amps.
Backup Camera Retention Adapters
- Preserve factory camera feeds when upgrading to a new screen.
- Prevents the need for expensive aftermarket camera swaps.
Bluetooth/Hands-Free Modules
- Keeps factory Bluetooth microphones functional.
- Important in vehicles where the mic is integrated into the roof console.
2. Why Adapters Are Critical
- Avoids loss of factory features (e.g., no steering controls, no warning chimes).
- Prevents dashboard error codes caused by missing digital signals.
- Saves installation time and reduces customer dissatisfaction.
- Provides a clean, professional integration.
3. Sino-conn Advantage
Sino-conn engineers design vehicle-specific adapters with:
- OEM-grade plastics and precision molding.
- Shielded wiring to reduce noise.
- Compatibility testing across multiple vehicle platforms.
- Custom branding options for retailers and installers.
Example Table: Adapter Functions
| Adapter Type | Primary Role | Key Benefit |
|---|---|---|
| CAN-Bus Module | Digital-to-analog signal conversion | Enables aftermarket stereo in modern cars |
| SWC Adapter | Steering wheel button retention | Maintains OEM convenience |
| Antenna Adapter | OEM-to-aftermarket antenna conversion | Preserves radio signal quality |
| Amp Bypass Harness | Bypass factory premium amplifier | Prevents sound distortion issues |
| Camera Retention Module | Retains OEM backup camera | Saves cost, keeps safety feature intact |
Troubleshooting Common Harness Issues
Troubleshooting stereo harness issues means checking for power, ground, and proper speaker connections first. Common problems include no sound, blown fuses, reversed polarity, or dead battery drain from miswired power leads. Using a multimeter, confirming wire colors, and ensuring secure crimps or solder joints usually solves 80% of issues. Factory amps, CAN-Bus systems, and steering wheel controls often require specialized adapters—without them, you may lose functions or get error codes.
Even with the right harness, issues can happen. Most problems fall into a few categories:
1. Power & Ground Problems
- No Power: Usually caused by mixing up accessory (red) and constant 12V (yellow) wires.
- Battery Drain: If accessory and constant wires are tied incorrectly, stereo stays on even when car is off.
- Poor Ground: A loose or painted metal contact leads to weak or inconsistent stereo function.
2. Speaker Issues
- No Sound in Some Channels: Likely due to swapped or cut wires.
- Phase/Polarity Errors: Speakers sound weak or distorted when positives and negatives are reversed.
3. Factory Amplifier Conflicts
- Cars with Bose, JBL, or Infinity amps need integration harnesses.
- If not installed, stereo powers on but no sound reaches speakers.
4. CAN-Bus/Data System Errors
- Modern cars rely on digital data buses. Without CAN-Bus adapters, stereo may not receive ignition power or dimming signals.
- Symptoms: Warning lights, “No Audio” errors, or stereo stuck in standby.
5. Poor Connections
- Using electrical tape instead of crimp connectors often causes shorts when wires shift.
- Solder + heat shrink or proper crimping is the gold standard.
6. Tools That Help Troubleshooting
- Multimeter: For checking voltage and continuity.
- Test Speaker: To verify audio output.
- Wiring Diagram: OEM diagrams prevent color confusion.
Cost Considerations for Harnesses & Adapters
Car stereo wiring harnesses typically cost between $10 and $50, while specialized adapters like CAN-Bus interfaces, amp bypass harnesses, or steering wheel control modules range from $30 to $120. Labor adds $75–$150 if installed professionally. Choosing the right harness upfront saves on hidden costs like repairs or lost OEM features. Buying from reliable suppliers ensures proper fit, warranty support, and reduced long-term expenses.
1. Price Ranges
- Basic Harnesses: $10–$20 (handles power & speakers only).
- OEM-Specific Harnesses: $20–$50 (exact factory fit, plug-and-play).
- Specialized Adapters: $30–$120 (CAN-Bus, SWC, amp bypass, etc.).
2. Installation Labor
- Professional installers typically charge $75–$150/hour.
- A simple harness swap: ~30 minutes.
- Complex installs with CAN-Bus or factory amp: 2–3 hours.
3. Hidden Costs
- Wrong harness = potential damage. Fixes may cost hundreds.
- Missing adapter = loss of radio reception, steering wheel controls, or sound system.
- Cheap generic harnesses = loose fit, poor insulation, risk of shorts.
4. Value of Quality Harnesses
- OEM-matched connectors prevent damage to factory plugs.
- Heat-resistant insulation withstands automotive environments.
- Warranty support reduces risk.
Example Cost Guide Table
| Component | Price Range | Notes |
|---|---|---|
| Basic Stereo Harness | $10–$20 | Power & speaker wires only |
| Vehicle-Specific Harness | $20–$50 | OEM fit, includes color-coded leads |
| CAN-Bus Interface | $40–$120 | Needed for modern data-driven cars |
| SWC (Steering Wheel Control) | $30–$60 | Retains button functionality |
| Amp Bypass Harness | $25–$50 | For factory premium audio systems |
| Labor (Installer) | $75–$150/hr | Varies by complexity of install |
Wiring Harness Connectors and Products
Wiring harness connectors come in many types—OEM plug-in harnesses, ISO connectors, quick-disconnects, and specialized adapters for amplifiers, CAN-Bus, or steering wheel controls. The right product depends on vehicle make, stereo brand, and features you want to retain. Reliable suppliers like Sino-conn provide custom harnesses with high-quality insulation, gold-plated pins, and precise OEM fit, ensuring durability, safety, and easy installation for both aftermarket upgrades and OEM integration projects.
Harness connectors are the critical link between your stereo and vehicle. Choosing the right connector means saving hours of labor and avoiding costly mistakes.

1. Common Connector Types
- OEM Plug-in Harnesses: Vehicle-specific connectors that make installs plug-and-play.
- ISO Connectors: Standardized European connectors used in many aftermarket stereos.
- Quick-Disconnects: Allow modular connections between stereo and accessories.
- Specialized Adapters: For amps, CAN-Bus systems, and SWC (steering wheel controls).
2. Connector Quality Factors
- Contact Plating: Gold or tin plating resists corrosion and ensures conductivity.
- Insulation: High-temp PVC or TPE prevents melting or shorts in automotive heat.
- Fit Tolerance: Poorly molded connectors can loosen or damage factory plugs.
3. Sino-conn’s Role in Connectors
Sino-conn provides custom-engineered connectors designed for:
- Exact OEM fit: Ensures seamless integration.
- Durability: Withstand 10,000+ mating cycles.
- Shielding: Options for EMI-sensitive environments.
- Customization: Logo branding, low MOQ, and multiple color options.
4. Why High-Quality Connectors Matter
- Prevent intermittent failures from vibration.
- Maintain safety (no overheating or shorting).
- Reduce warranty claims and installer callbacks.
- Preserve advanced vehicle features like airbags, Bluetooth, or GPS systems.
Connector Options vs Use Case
| Connector Type | Use Case | Notes |
|---|---|---|
| OEM Plug-in Harness | Factory stereo replacement | Plug-and-play, vehicle-specific |
| ISO Connector | Aftermarket stereos (Euro standard) | Widely supported, universal fit |
| Quick Disconnect | Modular installs, accessories | Fast swaps, flexible upgrades |
| CAN-Bus Adapter | Modern cars with digital control | Required for data, ignition, lighting |
| SWC Adapter | Retain steering wheel button controls | Adds convenience, especially in new cars |
| Amp Bypass Harness | Premium OEM audio systems | Needed for Bose, JBL, Infinity integration |
Conclusion: Upgrade Smarter with the Right Stereo Wiring Harness
Upgrading your car stereo isn’t just about picking a head unit—it’s about ensuring every wire, signal, and feature works flawlessly together. From understanding the basics of a stereo wire harness to navigating advanced adapters like CAN-Bus modules and steering wheel control interfaces, you’ve seen how much detail and precision goes into a successful installation.
A wiring harness is the bridge that ensures your aftermarket stereo integrates seamlessly with your car’s electrical system. Choosing the right harness—and sourcing it from a trusted factory—saves time, avoids costly mistakes, and guarantees that your investment pays off with crystal-clear sound and preserved OEM features.
At Sino-conn, we specialize in OEM-quality harnesses, adapters, and custom solutions for global brands, installers, and distributors. Whether you need a factory-fit harness, a customized solution for your brand, or technical support to ensure compatibility, our team delivers fast turnaround, low MOQ options, and global compliance certifications.
Ready to make your stereo upgrade smooth, reliable, and future-proof?
Contact Sino-conn today for tailored harness solutions, free consultations, and expert guidance that helps you avoid installation headaches and deliver superior results to your customers.